IPSEC Tunnels
The MikroTik Security Guide and Networking with MikroTik: MTCNA Study Guide by Tyler Hart are available in paperback and Kindle!
Preface
IPSEC is one of the most commonly used VPN technologies to connect two sites together over some kind of WAN connection like Ethernet-Over-Fiber or Broadband. It creates an encrypted tunnel between the two peers and moves data over the tunnel that matches IPSEC policies.
Navigation
- Nomenclature
- IPSEC Policy vs Routing
- IPSEC Topology
- Mikrotik IPSEC Peers
- Mikrotik IPSEC Policy
- Mikrotik NAT Bypass
- IPSEC Tunnel Testing
Nomenclature
"Peers" and "Policy" will be used a lot in this article, so it's important to know what they mean. Peers are the endpoints for IPSEC tunnels. Policies are the settings that define the interesting traffic that will get pushed over the tunnel. If packet traffic isn't covered by a policy it isn't interesting, and gets routed like any other traffic would be. If packet traffic does match what's in a policy, the router defines those packets as interesting, and sends them over the tunnel, rather than routing them.
IPSEC Policy vs Routing
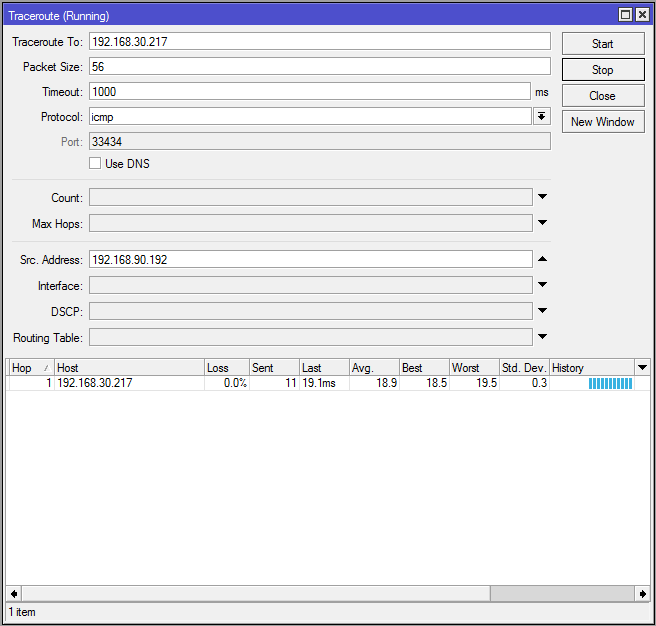
There's a very important distinction that needs to be made here - IPSEC isn't routing. IPSEC doesn't create virtual interfaces that are added to a route table like PPTP or GRE do. IPSEC isn't based on routing, it's based on policy. In fact in the diagram below when tracerouting from one LAN subnet to another through two branch routers and multiple Internet routers only one hop is seen.
IPSEC Topology
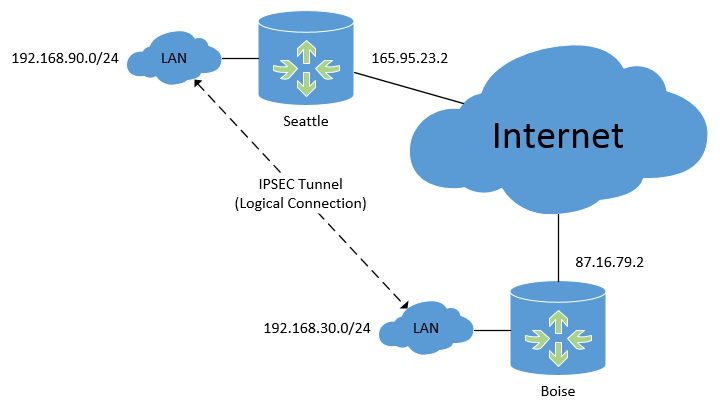
Below is the physical topology diagram of what we're working with, and it shows the logical connection that the IPSEC tunnel will create between subnets.

We have two routers, in Seattle and Boise, both connected to the Internet somehow with their own static IP addresses. These routers could be at two offices owned by one company, or just two locations that need to be connected together. We need computers or servers at one location to be able to contact devices at the other, and it has to be done securely. An IPSEC VPN is perfect for this sort of implementation.
Mikrotik IPSEC Peers
First, on each router we'll configure IPSEC peers. The peer will point to the opposite router's public IP address, with Seattle pointing to Boise and Boise pointing to Seattle. It's very important to add comments to your peer and policy entries, so you know which points to which.
Seattle Peer
On the Seattle router:
/ip ipsec peer add address=87.16.79.2/32 comment="Boise Peer" enc-algorithm=aes-128 nat-traversal=no secret=my_secretBoise Peer
On the Boise router:
/ip ipsec peer add address=165.95.23.2/32 comment="Seattle Peer" enc-algorithm=aes-128 nat-traversal=no secret=my_great_secretThe encryption algorithm and secret must match, otherwise the IPSEC tunnel will never initiate properly. In production networks a much more robust secret key should be used. This is one time when network administrators often generate long random strings and use them for the secret, because it's not something a human will have to enter again by memory. Secret keys should be changed on a regular basis, perhaps every 6 or 12 months, or more often depending on your regulatory needs. Do not enable NAT traversal, it's pretty hit-or-miss. This feature is meant to help get around NAT'ing, which breaks IPSEC, but it doesn't always work necessarily.
Mikrotik IPSEC Policy
Second, we'll configure the IPSEC policies. These are what tells the router was traffic is "interesting" and should be sent over the tunnel instead of routed normally. Because this IPSEC tunnel will be a site-to-site tunnel connecting two networks (instead of hosts) we'll specify tunnel=yes in the configuration. This is also required per Infrastructure Router STIG Finding V-3008:
...ensure IPSec VPNs are established as tunnel type VPNs when transporting management traffic across an ip backbone network.
https://www.stigviewer.com/stig/network_devices/2015-09-22/finding/V-3008
If you look at the policies side-by-side you'll notice that the IP address entries on both routers are reversed - each router points to the other. It really helps to open up the same dialog boxes in two Winbox windows, looking at them side-by-side, checking that the SRC address on one router is the DST address on the other.
Seattle Policy
On the Seattle router:
/ip ipsec policy add comment="Boise Traffic" dst-address=192.168.30.0/24 sa-dst-address=87.16.79.2 sa-src-address=165.95.23.2 src-address=192.168.90.0/24 tunnel=yesBoise Policy
On the Boise router:
/ip ipsec policy add comment="Seattle Traffic" dst-address=192.168.90.0/24 sa-dst-address=165.95.23.2 sa-src-address=87.16.79.2 src-address=192.168.30.0/24 tunnel=yesMikrotik NAT Bypass
If you're using NAT to send multiple internal LAN IPs out one interface to the Internet we'll need to bypass that. If we don't set up a NAT bypass the NAT process will snatch up our traffic before the IPSEC policies have a chance to move it over the tunnel, and those packets will get NAT'd out into oblivion. We'll create these NAT rules on each router, and move them up above any others.
Seattle NAT Bypass
On the Seattle router:
/ip firewall nat add chain=srcnat comment="Boise NAT bypass" dst-address=192.168.30.0/24 src-address=192.168.90.0/24Boise NAT Bypass
On the Boise router:
/ip firewall nat add chain=srcnat comment="Seattle NAT bypass" dst-address=192.168.90.0/24 src-address=192.168.30.0/24IPSEC Tunnel Testing
At this point we have everything needed for a functioning IPSEC tunnel. With that being said, most routers do not keep IPSEC tunnels up all the time. If no interesting traffic is being pushed over the tunnel most routers tear the tunnel down and don't bring it back up until the policies are triggered again with interesting traffic. This can create a tiny bit of latency when traffic first starts, a moment is needed to build the tunnel. RouterOS features like Netwatch and scheduled ping scripts can create traffic that keeps the tunnels up, but you shouldn't see an appreciable difference, especially if you're moving data frequently from one subnet to another.
For IPSEC tunnels that stay up all the time and also give you routed virtual interfaces, take a look at running GRE over IPSEC.
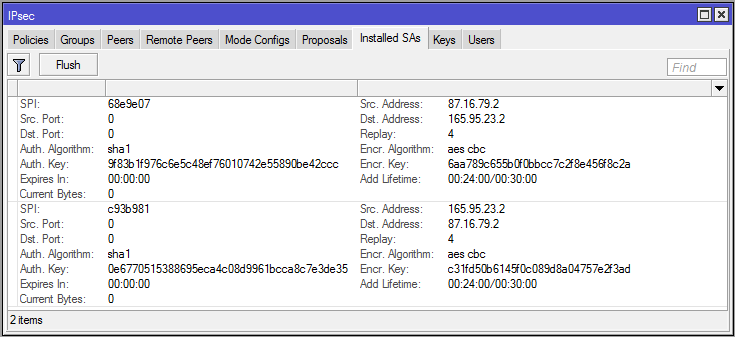
To force this IPSEC tunnel to come up I've sent pings from one subnet to the other, creating interesting traffic and triggering the IPSEC policy. When viewing the Installed SAs on the Boise router we can see that encryption keys have been established, and that on each side the SRC and DST addresses correspond with each other:

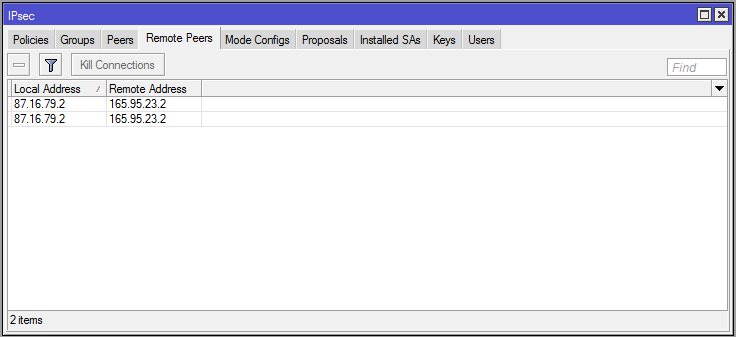
In the Remote Peers tab it also indicates that the Seattle router is an established remote peer:

On the Seattle router you'll see the same information in the Installed SA and Remote Peers tab, but the IP addresses will be backwards from Boise's.
Tracerouting from an IP address on the Seattle LAN shows one hop to an IP address on the Boise LAN:

Notice that I specified the source address in the traceroute above. This is so that the packets sent for the traceroute will appear to originate inside the IPSEC policy's SRC network, and be headed to a DST network that matches the policy as well - interesting traffic. If you just try pinging straight from one router to another it won't work, because the packets won't match the policy and IPSEC will ignore them. Either specify the SRC to match the policy when pinging from the router, or ping from a real host inside those subnets.
There is a lot more we can do with IPSEC VPNs, like running GRE over a tunnel for routing or using OSPF, but this is a great start.